Blog
Why Choosing a Design-Build Contractor Is Smarter Than Piecing Together a Project After Design
Why Choosing a Design-Build Contractor Is Smarter Than Piecing Together a Project After Design
When it comes to construction, whether residential or commercial, the early decisions you make have a lasting impact. One of the most critical decisions is choosing how your project will be executed — and more specifically, whether to go with a design-build general contractor or work with separate firms for design and construction.
The Problem with Piecing It Together
Many property owners follow a traditional route: they hire an architect to develop the plans, and once approved, they go shopping for a general contractor (GC) to bring the design to life. While this approach may seem logical, it often leads to:
- Cost overruns due to design choices that don’t align with real-world construction budgets
- Finger-pointing between designer and builder when issues arise
- Delays caused by poor handoff and lack of early collaboration
- Unexpected change orders and scope creep
The Design-Build Advantage
When you hire a design-build general contractor, you’re hiring one integrated team that handles your project from concept to completion. Here’s why that’s a game-changer:
- Single point of accountability: One entity is responsible for both design and construction, streamlining communication and accountability.
- Better cost control: Builders are involved early, ensuring the design matches the target budget.
- Faster delivery: Design and construction can overlap, reducing total project timeline.
- Collaborative problem-solving: Potential issues are solved before breaking ground — not after.
Case in Point: Green Drafters’ Design-Build Approach
At Green Drafters, we’ve seen firsthand how aligning design with build avoids miscommunication, cuts down on surprises, and leads to better client satisfaction. Our design-build method ensures that both vision and execution live in the same conversation from day one.
Final Thoughts
If you’re looking to save time, reduce risk, and ensure your project is executed exactly as envisioned, consider a design-build general contractor. Don’t leave your project’s success up to chance — align your team from the start.
Contact Green Drafters today to learn more about how our integrated approach can benefit your next project.
Architectural Drafting for ADUs: Maximize Space & Value with Expert Plans
As cities across the country relax zoning laws and promote housing density, Accessory Dwelling Units (ADUs) have become a hot topic for homeowners and real estate investors alike. But turning your garage or backyard into a legal, livable space starts with one critical step: expert architectural drafting.
Why Quality Drafting Matters for ADUs
Whether it’s a detached guest house, a converted garage, or a basement studio, an ADU must comply with your city’s specific building codes, fire regulations, and utility connections. Accurate architectural plans ensure:
- Faster permit approvals
- Optimized use of limited square footage
- Structural compliance and safety
- Better coordination with contractors and trades
What’s Included in ADU Drafting Packages
At Green Drafters, we provide complete drafting packages that typically include:
- Site plans and zoning analysis
- Floor plans and elevations
- Foundation, framing, and roof details
- MEP (Mechanical, Electrical, Plumbing) layout guidance
Designing with Purpose
Our approach goes beyond code compliance — we design for livability, resale value, and future adaptability. Whether you’re creating a rental unit, in-law suite, or guest house, our team will help translate your vision into a fully permitted reality.
Start Your ADU Journey Today
Need professional ADU plans in California or beyond? Let our experienced drafting team help you avoid permit delays and costly design revisions. Contact Green Drafters today to schedule a consultation.
Citrix Synergy 2014 and NVIDIA GRID – Running REVIT on the Cloud
I wanted to share my experience that I was lucky enough to be a part of running Revit “on the cloud”.
At first, this job seemed like any other: Design a modern custom home for a 6,431 square foot lot. I began as I always do by opening the Revit file containing surveyed contour and vegetation data plus the structural pilasters provided by the civil engineer. That’s where the similarity between this project and everything I had done to date ends… because this time I was at the NVIDIA GRIP booth at Citrix Synergy 2014 in Los Angeles; more precisely at the Anaheim Convention Center in Orange County designing this house in real time using a thin client connected to a cloud-based virtual desktop infrastructure (VDI) running Revit.
For three days, I focused on creating highly-detailed sections and renderings that would test how well Revit performed in a VDI power by NVIDIA GRID K2 and delivered by Citrix XenApp. The purpose of this was to show off what NVIDIA GRID technology can do… not in a canned demo, but with a real-life house designer (me!) doing actual work on real VDI setup running NVIDIA GRID K2 from a server housed in the show’s datacenter. So how did NVIDIA GRID measure up?
The short answer is that I was blown away. Over those three days, I designed a 2-story home with 2,553 sqft and a maximum height of 36 ft as if I was sitting in front of my personal workstation in my office. The GRID-powered VDI performed flawlessly, handling the large project size (124.148KB) and many renderings with ease. The only lag I noticed occurred when creating final renders with custom lighting directly from Revit – and this was completely normal, as I usually create these renderings using a render farm.
My first rendering test turned out great, (see screenshot below) except for one of my finish’s image turned out missing but nothing I can’t fix.
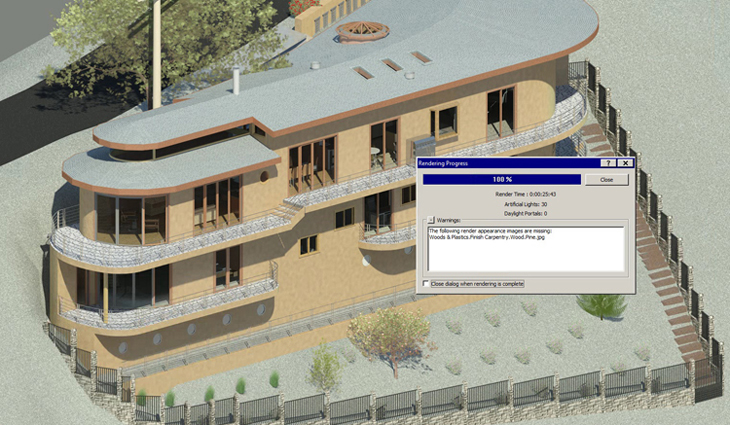
First Render-using the Nvidia GRID K2 and Citrix XenApp
The bottom line is that I did not notice any performance degradation between my personal workstation and the NVIDIA GRID K2 VDI. What I did notice was the simple thin client on my desk that took up far less space, needed far fewer cables, and caused far less clutter than my workstation.
Considering all the benefits from this type of setup such as onsite client collaboration, the power to render on the cloud is absolute a must. Here is another final render shot.
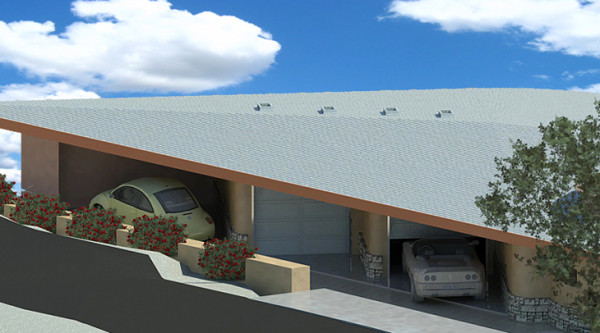
Final Render-using the Nvidia GRID K2 and Citrix XenApp
Want to see more? I will update this post once I have uploaded a video of the final walk-through renders which shows you the results of my 3-days at the event.
It’s also easy to consider other possibilities by running Revit in a virtual environment. Since the graphics heavy lifting is done by the VDI server, I could use myMacbook Air or possibly even an Ipad to continue the design work away from my office, maybe at a Starbucks. I also realized the intriguing potential of client/designer collaboration at the job site. Tweaking the design with the client in Revit, on-site. Now that is cool.
If you have any comments or experience running Revit using this set-up I would like to know about your experience.